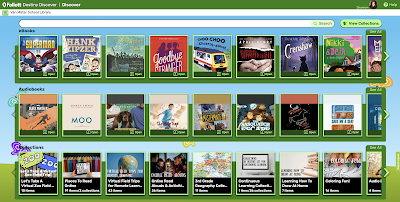
Throughout the year and especially over the last two months with remote learning, Destiny Discover has been one of the places our students and families go for all of their reading and learning needs.
I especially love how we can now make the homepage a place to personalize this experience for our community by adding messages, news, pictures, special Collections by Destiny, highlighted events and so much more.
It truly can be the first stop for all of their reading and learnings needs.
Let me show you how, friends!
When you are logged into Destiny Discover, click on the menu on the left hand side and go down to Admin.
Click on Admin to open up the window for Featured Content where it gives you a place to change content for....
...Featured Content Column A and Column B. Within those two places, the titles and content can be added and changed by clicking on the little pencil that I have circled in the image above.
In the Your Content window, you can add text, images, videos, link and even change the format, font, color, etc...
In this column, I wanted to add the Bitmoji bookmark and message I created for our students. They will get the bookmark in the mail this week so this will be a special surprise to see here too.
You can read how I created the Bitmoji bookmark here.
To add an image, click on the little picture icon and select the image you want from your computer. I took a screen shot of the Bitmoji bookmark to add.
Once I had the image added in the Your Content window, I highlighted the image, clicked the link, added the URL to the Bitmoji bookmark I created in a Google Slide and clicked on Save.
An image can be added by itself or..
...with a little text like I did on our home page. You can even add hyperlinks to the text.
I added a link that takes them to our Continuous Learning Site.
Later this week, I will be adding a new Bitmoji scene I am creating for summer reading and learning and a few tips for other summer fun.
I then moved to Column B. I use this as a place to share more places for reading and learning. The content is added the same by clicking on the pencils circled above.
Once you click the pencil, the Your Content window pops up to add text, videos, links and images.
I just add an image to Column B and then hyperlink to the resource like I did in Column A.
Right now, I have a Collection by Destiny highlighted.
I took a screen shot of the Collection and then linked the image to the Places to Read Collection.
I have also done with this with...Choice Boards created in Google Slides,
You've Been Virtually Book'd Buncee's,
and more.
These two columns at the top, along with the Learning Links that can be....
...customized and added to...
...join ribbons of eBooks, audiobooks, Collections, new books and more, will make this the first stop for reading and learning to your students, families, teachers and community too!
You can learn more about Destiny Discover here on the Follett website.


What size pixels is your screenshot for "Your Content" image of your bookmark in Follett Destiny Discover. My image doesn't show up?
ReplyDeleteThanks.
So do you do this instead of a webpage?
ReplyDeleteThank you for doing this! I have been asking for a basic 'how to' all year and no one seemed to able to steer me towards a simple step-by-step. Thank you for taking the time:)
ReplyDeleteI tried following the steps, but am completely lost. Any chance you could go live or do a webinar with step by step on how to do this???? It is so awesome and looks so much better than what I have now I really want to do it! Thank you!
ReplyDelete