Thursday, August 29, 2019

A NEW Research Mashup With PebbleGo Research Buncee's!

Here we are in the first week of school and we are brainstorming, meeting and putting lots of new ideas into motion at our school.  We want to make it the best year for our students through innovative and amazing learning experiences every day.  

We had one of these experiences take place in our 2nd grade this week.  
It started while sharing the new updates to Capstone's PebbleGo with my friend and colleague, Tracy Ferguson, who teaches 2nd grade at Van Meter.  

PebbleGo is one of our students favorite places to go to read, learn, research and share. We have access to all five modules, along with the four in Spanish too. 
As we looked at the wonderful activities that compliment the articles in PebbleGo, we started brainstorming how we could take these ideas and make it digital and interactive.  

We want to give them a place to bring the learning and excitement they are experiencing throughout their research in PebbleGo and other nonfiction eBooks found in our Destiny library to life! 
Right away we knew that Buncee can be that place!  With this amazing digital tool, our 2nd graders can add all kinds of elements including stickers, animations, text, drawings, voice and even videos, to bring deep meaning around their learning and to give them a creative voice in sharing what they have learned.  

Buncee can give all students a special place to share what is important to them and to shine. This is exactly what we were looking for in this year long project of a digital research journal.  
I left our meeting and wrote a note to my friends at Buncee.  I sent them a picture of our brainstorming and we talked through what this could look like in Buncee. 
Not only did we want a place for our students to be able to write what they were learning through their reading, research and thinking, we wanted a place for them to share their learning through visual representation by drawing, finding photographs online, using stickers, emojis and animations, and even taking their own photos or adding a little video, which is one of our favorite features found in Buncee. 
I was so excited and put together a little example from a template I found in Buncee.  

The next morning, after sharing this example and ideas, our friends at Buncee surprised Tracy and I with....
...four Buncee PebbleGo Research Journals!  We wanted them to be able to have choice and really personalize the look of their research journal. 
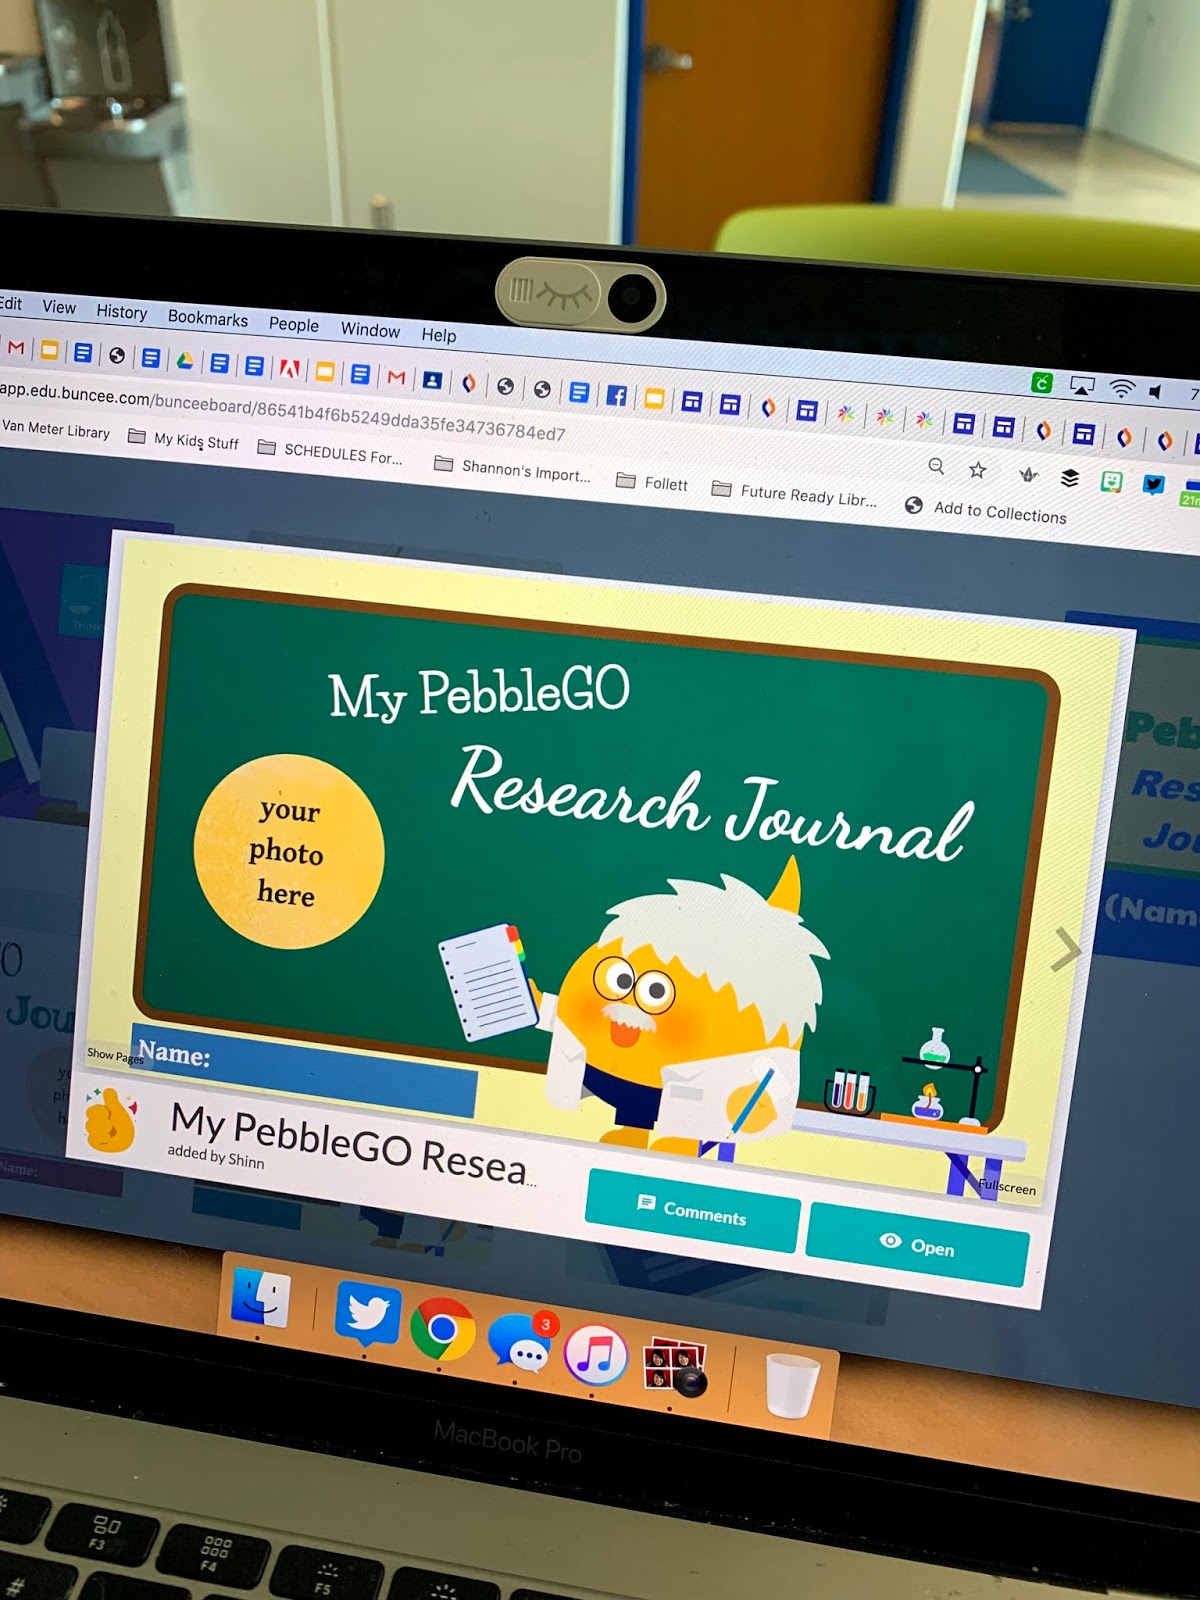
We talked through a few things to make sure they were ready to go for our 2nd graders and added them to the Templates in Buncee. 
Each one contains a cover where each student will be able to personalize with their name, photo and any other Buncee assets to make it unique.
Buncee created different pages for them to use when doing their research.  They included 20 of these pages in each journal and the students can always add more when needed.
Since they will be using these all year long to reflect and support their reading and research, we know they will definitely need them.
 Take a look at the others too.
In the afternoon, I went to Tracy's room to kick off the project.  

First, we spent some time in PebbleGo showing the 2nd graders the new updates and talking about how to read and listen to an article.  
I picked sea turtles and told them my connection with just seeing one for the first time in Hawaii. We learned so many interesting and fun facts while researching and talking about the sea turtle article.
Next, we talked about taking the information we learned and using a journal to document this through writing and drawing.

We explained we would be using Buncee to do this throughout the year.   They were so excited!
Tracy and I showed them where to find the PebbleGo Research Journals in Buncee and picked one as an example.
We modeled and discussed what it would look like to fill in the journal page where it said,
 When I was researching, I learned.... and Add your drawing. 
We went back and forth between the PebbleGo article and Buncee adding details, facts and working on the little design elements we wanted to add to make our page just the way we wanted it.

The 2nd graders enjoyed learning how to add text, stickers, and animation while asking questions about changing font size and color, arranging things on the page and adding pictures of sea turtles in Hawaii too.
We helped them get logged into their new Buncee class they would be using this year. They couldn't wait to get started!
Later in the day, Tracy helped her class get into PebbleGo to pick the first article they would research.  This smile says it all at how happy they were to start this project. 
 They took careful notes in their journal over an animal....
 ...article in PebbleGo.
Then they went back to Buncee to pick their Buncee PebbleGo Research Journal and add a few things of their own.

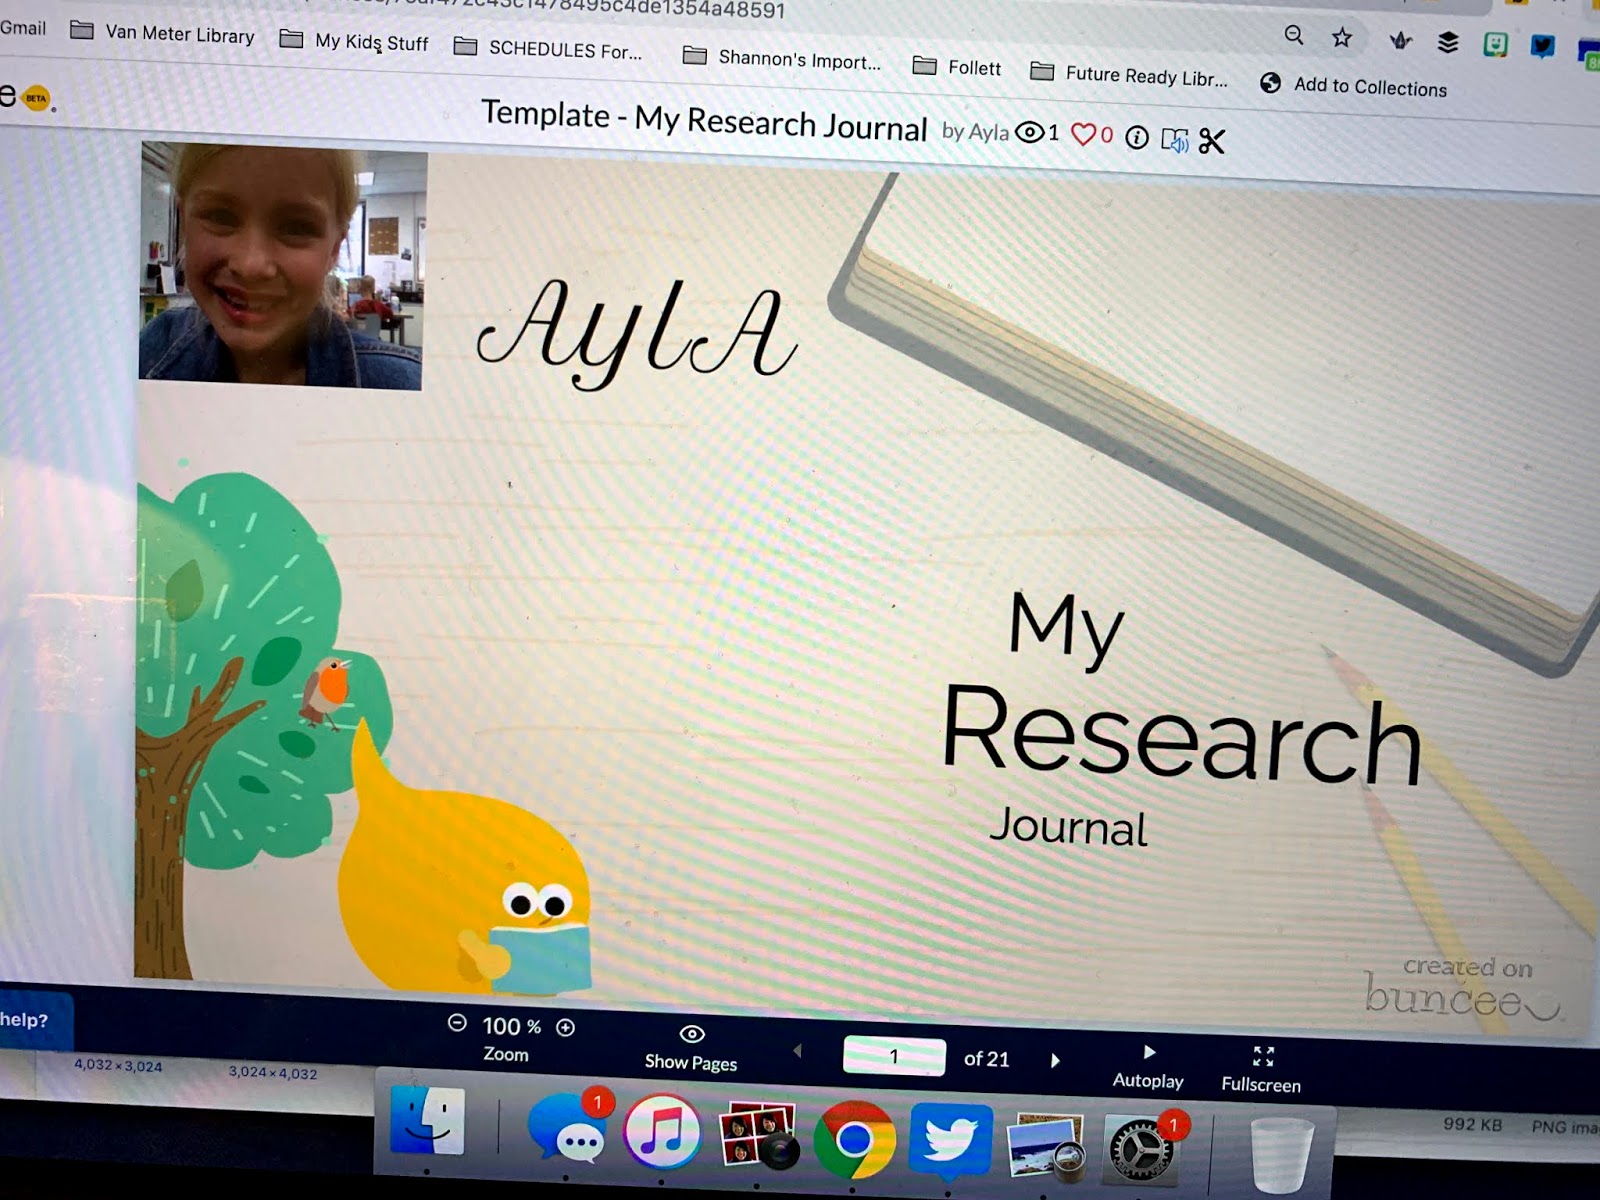
We love how they took their picture in Buncee to add to their front cover.
With their covers complete, they were ready to start adding what they were reading and learning from their research in PebbleGo.
As you can see, the 2nd graders were engaged and excited about this wonderful learning opportunity with PebbleGo and Buncee.  They are proud of the research journals they have started and can't wait to add to these throughout the year.  

One boy even asked, Can we do this at home too?  That just made our day!  

Next week, I will collaborate and co-teach with the three other second grade teachers as we roll this out to their students.  It will be fun to have our students in all four sections of 2nd grade share their Buncee PebbleGo Research Journals with each other and their families too. 

We want every one of our students at Van Meter to have that motivation and love of learning, reading and creating unique and special things each and every day.  With innovative experiences like this one, we know great things will happen. 

Thank you Buncee and Capstone for making this project a reality for our students and others around the world.  You help us make a difference! 
You can learn more about Capstone's PebbleGo here and Buncee here.   Check back in as we will be sharing more about this project soon. 

Tuesday, August 27, 2019

Steps To Kick Off Follett Book eFairs At Your School!

There is a lot of excitement going around about a new way to do book orders! 
They are called the Follett Book eFairs, Classroom Book Orders, Reimagined.  

Follett has taken a fresh, new look at how to improve on the solution of book fairs that schools have been using for years.  They have re-imagined the whole classroom book ordering process, making it easier and simpler for teachers, and providing new and exciting improvements that will help to ensure that they can support reading/literacy in school and at home, and get schools, classrooms and libraries an additional source of funding.

You can read even more about Follett eFairs in this post I wrote on my blog
To kick off our year at Van Meter, we kicked it off by having a little Follett Book eFairs Party during the first week of school with all of our teachers who will be having eFairs.  
We gathered all of the teachers together and asked them to bring their laptops so they would have a way to sign up for the Follett Book eFairs.  I wanted to make sure I helped them walk through all of the steps of signing up and getting set to launch their eFair. 

You can do this at your school too with such a few quick steps.  Let me tell you how!  

The first thing we did was give everyone this ticket....
...which included the Follett Book eFairs details and had the URLhttps://k12.follett.com/efair-signup-teachers, to visit and sign up before we even started.  

By signing up, all of the teachers earned $25 in rewards credit just for running their first eFair.  
After they were signed up, I had them write their name on the ticket, tear off that part and add it to the fishbowl for the drawings.  We gave away lots of awesome books and little swag items during our event. 
Next, we had everyone go to efairs.follettbookfairs.com where they....
...clicked on the Teacher Login in the upper right hand corner....
 ...to sign up with their school email.
Once they added their email, eFairs prompted them to Tell us a little more about yourself.  This is where details such as grade level, number of students, and school address can be added.
After those details were entered, their main eFair pages popped up with names at the top of each. This will keep the information of their eFairs and point them to lots of important information.

It was now time to Create a New eFair by clicking on the book, circled in hot pink above.
There are 4 Steps that must be completed.  After each step, click on the Next button in the right hand corner.

1. Choose Dates
Something important to note...Follett recommends you end your eFair on a weekend to give parents time to purchase books.  Remember to share your class code with parents so they can access your eFair. 
 When the dates are entered, click Next. 
2. Recommend Books

One of the coolest things about Follett Book eFairs is the ability we have to Recommend Books that will be included in the book orders.
It is super simple to choose the recommended books by clicking on the + sign and searching for books in the search bar at the top.
 I picked Otis and the Puppy. When I clicked in the cover, it flipped over....
 ....to show details about the book such as author, publication year, Follett Interest Level and a description.

When you click on Recommend, it will be added to your Recommend row on the book order form.

You can also click on See Details, 
which brings you into a more detailed record and a place to write Your Recommendation. 

When I think of these recommendations, I think it would be awesome to focus around a theme being taught in class, a special event happening, favorite books of your students and so much more.  You can have a lot of fun with this part of the eFair order forms.
As students and families scroll through the book order, they will see Recommendations at top and lots of wonderful groups of books below such as.....
Remember, these will change according to the grade level you enter at the beginning too.
At the very bottom of the form, your students and families can also search the entire Follett Book eFair Catalog for even more books.
3. Share Your eFair.

There are a few ways to share your eFair. You can share the link provided, which will take them directly to your eFair so they can view and purchase books.
You can slo download flyers from the link.
And printed flyers can be sent if you choose the Send Me Printed Flyers box on this page.  It will take 5 business days to receive these in the mail.
All you have to do is add the Class Code and Due Date to the back of the order form.  

They can go to the URL listed or scan the QR code to get to the Follett Book eFair site. 
4. And the last step is Finish.  

Once you make sure everything is correct, you will click Done in the bottom right corner to get everything moving.
Now when you go to your Follett Book eFair Dashboard, you will see how many day left of your eFair at the top and....
 ...will locate all of the things you will need on the left hand side.
 You will find the Dashboard, 
 eFair Stats, 
 Browse Books, 
 and Settings from this menu.
And one of the MOST important and exciting parts....Shop Now, which you will find on your Dashboard.

I have circled the Shop Now button in hot pink.  When you click on that, it will take you to....
...the Follett Book eFair Store where you can search for books by grade and through the search bar.  
There is definitely something for everyone of your readers and every community, family and classroom here.  
It has been exciting since our little kick off celebration to see how our teachers are sharing eFairs with their students and families.  They can't wait to roll this new way to do book orders. 

And we know that you will love it too! 
As you get signed up for Follett Book eFairs at the links above, you can also earn a $5 bonus for up to 10 teachers that you sign up using this form